

Thought storing your RV for the winter was as simple as backing your motorhome into a driveway or sideyard and throwing on a cover? Think again.
If you belong to one of the 11.2 million U.S. households that own an RV, it’s important that you prepare your recreational vehicle for the cold weather through proper winterization. If you don’t, these subzero temperatures can freeze the water circulating through your RV’s pipes, leading to pipe bursts and a damaged plumbing system. For some RVers, repairs have cost as much as $4,600.
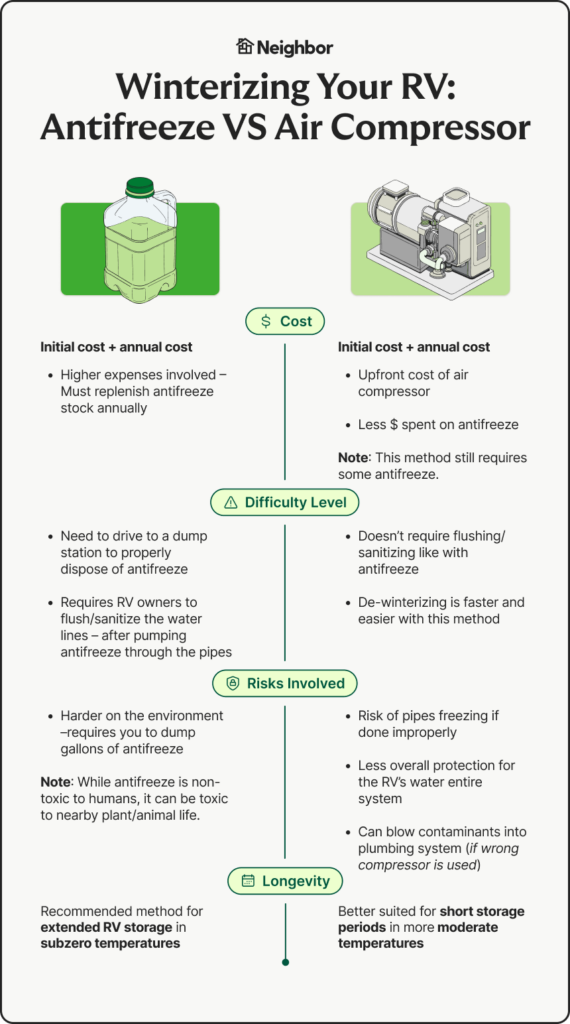
When winterizing your RV, you have two options: hire a professional to help or take the DIY approach. If you purchase a basic winterizing package through an RV dealer, the start-to-finish process will cost you an average of $130-$170.
If that $170 fee is out of budget, you’ll want to roll up your sleeves and take the following steps to winterize your RV on your own.
Before Winterizing…
Before winterizing your RV plumbing system, remember that all campers and trailers have a unique build and style. Therefore, you must tailor the winterization steps according to your specific RV model.
In addition, you’ll want to settle on an RV storage option before beginning the winterization process. With storage in place, you’ll know exactly where to put your winterized RV once the process is complete. If you’re still browsing for RV storage, check out peer-to-peer storage marketplaces like Neighbor.
While you can technically still use a winterized RV, many RV owners choose to store their RV for the winter, given the fact that an RV’s water sources can’t be used post-winterization without running the risk of frozen pipes.
If you’re still worried about how the extreme cold will negatively impact your motorhome–even after winterization–opt for indoor RV winter storage options like a storage unit.
Essential Tools to Winterize Your RV
Gather the below-mentioned tools to ensure you can successfully winterize your RV without a hitch.
- 2 to 3 gallons of RV Pink Antifreeze, depending on the rig’s size
- Water pump converter kit
- RV manual
- A screwdriver
- A socket wrench
- An air compressor
- An air compressor blow-out plug
- Bucket, towel, and flashlight (if needed)
- An anode rod removal tool, if your RV has one
What is RV Antifreeze?
RV antifreeze is a pink liquid that protects plumbing lines from freezing, expanding, and possibly exploding due to cold temperatures. RV antifreeze liquids come in two forms; one has a freezing point of -50F, and the other has a freezing point of -100F. After pumping this liquid into your waterlines, you must properly flush it out to avoid intoxication.
The RV Winterization Process
Time commitment: Less than an hour for experienced RVers and 2-3 hours for beginners.
Follow these guidelines to successfully winterize your RV:
Step #1: Completely Drain The RV
To winterize an RV, use a water pump to drain all the water from the water tanks. Once the system is properly drained, pour the antifreeze into the plumbing system. Always double-check that there is no remaining liquid in the pipes, as it will lead to the culmination of bacteria and RV plumbing system damage.
Apart from the water tank, you also need to drain these items:
- Open the valves of black and gray tanks and empty them into a sewer
- Turn off the water heater and remove the drain plug with a wrench to drain it completely
- Clean water from inside the sink, shower, and toilet bowl
- Open both hot and cold water faucets until they start spitting air instead of water.
Once you have drained the RV of all forms of liquids, use the air compressor to double-check. To do that, turn on the interior and exterior faucets and connect the air compressor hose to the water inlet.
Start the compressor at low pressure, as high pressure can damage the piping. After all the faucets are out of the water, carefully turn off the compressor to not damage the compressor.
Step #2: Pour RV Antifreeze Into Your RV Plumbing System
Now, it’s time to pour RV antifreeze into your water system to protect your trailer’s plumbing system from freezing over in winter. You must use food-safe antifreeze if you plan to use freshwater faucets for drinking and cooking when you take your RV out of storage.
You need to follow these steps to correctly pour antifreeze into the RV Plumbing system:
Step #3: Bypass the Hot Water Heater
You’ll need to ensure that anti-freeze doesn’t end up in the tank of the hot water heater, as it can damage the tank’s interior. You can only pour anti-freeze into the water heater bypass valve, and it will pump into the RV water lines.
Step #4: Connect the Bottle of RV Pink Antifreeze with RV Plumbing System
You can simplify the process of pumping RV antifreeze into the plumbing system by using a water pump converter kit. Open the kit and find a siphon tube that connects to the freshwater tank hose and the jug of antifreeze.
Some RVs offer a water pump winterization kit as part of their system, so make sure to check the manual to see if it is offered in yours.
Step #5: Pour Antifreeze into the Toilet and Sinks
Open the low-point drain faucets and start the water pump connected to the antifreeze. Once you see the pink liquid coming out, immediately close the low-point drains.
Next, open the faucets and valves on the inside and outside of the RV one at a time. Each time you see pink liquid pouring through, close the faucet or valve. This discharging of pink liquid indicates that the RV has been drained of any excess water and is ready to be winterized.
You need to repeat this process with the hot, cold, and freshwater faucets. When doing this task, make sure to turn off the water pump to avoid any water pressure build-up, as it can cause damage to the pump.
Step #6: Drain Siphon Hose
You also have to drain residual water from the siphon hose. To do that, lift the drain plug into a waste bucket, open the black tank valve, and watch until nothing comes out.
After this, get a jug or gallon of anti-freeze, insert the hose into the gallon, and turn on the water pump until all low-point drains are spitting anti-freeze.
Step #7: Pour RV antifreeze into P-traps
Finally, you will need to pump antifreeze (about half a cup) into the P-traps of your RV’s toilets, bathroom sinks, and kitchen sinks. This is just a way of making sure that everything is nicely covered in antifreeze so that no water drain or water line is left exposed to the risks of freezing over.
Storage Options for your Winterized RV
Once you have properly winterized your RV, it’s time to find long-term RV storage, sure to keep your RV safe during the winter months.
There are several options when it comes to storing your RV post-winterization, including the following:
Option #1: RV Campgrounds
Some RV campgrounds offer monthly storage options and allow you to keep your RV parked during the winter months. Before choosing a campground for winter RV storage, you’ll want to ensure the facility is open year-round and doesn’t close seasonally.
When opting for RV campgrounds, you do run the risk of the elements (harsh winds, winter storms) inflicting damage to your RV’s exterior. You’ll also need to be mindful of the higher risk of break-ins and theft while storing an RV at a designated campground.
Option #2: Private Storage
Private storage provides a safe and secure space to store your RV over extended periods of time. If you’re looking for affordable private storage, consider peer-to-peer self-storage platforms.
For example, with platforms like Neighbor, you can discover high-security RV storage units and covered parking stalls equipped with features like camera surveillance and alarm systems to ensure your RV’s safety.
Final Thoughts
Winterizing your RV isn’t the time to skip steps. If you aren’t able to dedicate the 2-3 hours it takes for a beginner to winterize an RV, enlist a professional. That way, your RV is ready to brave the winter storms ahead..
FAQs
Can I Winterize My RV Myself?
Yes, absolutely! Winterizing your RV yourself is a great way to save money. Although it requires a bit of work, you can do it correctly by carefully following each step of the process.
How Many Gallons of Antifreeze Does It Take to Winterize an RV?
Getting your RV ready for winter usually calls for about two to five gallons of RV Pink Antifreeze. It’s always better to play it safe with a bit extra than to come up short!
At What Temperature Does an RV Need to Be Winterized?
Once outdoor temperatures hit 32 Fahrenheit, you can get started on the winterizing process. You need to avoid the temperature where water freezes because it can cause extensive damage and lead to high RV repair costs.
What Happens if I Don’t Winterize My RV?
Neglecting proper winterization for your RV can lead to extensive damage from harsh weather conditions.
The exterior and interior may suffer, and water lines might even burst due to freezing, necessitating a complete plumbing system replacement. Consequently, you could face significant repair expenses to restore your RV to its former state.
How Much Does It Cost to Winterize an RV?
The expense of winterizing your RV varies based on the approach you choose. Opting for professional winterization can range from $100 to $500, while a DIY approach can be as economical as $50 to $100.
Is It Worth Covering Your RV in the Winter?
Yes, it is absolutely worth covering your RV in the winter! Properly winterizing, covering, and storing your RV is essential for maintaining your remote home.
Whether it is protecting the fresh water tank, the water lines, or the exterior body from rust and collateral damage, it is recommended to check out different RV winter storage options available near you.
Can You Live in a Winterized RV?
In most cases, you can still live in an RV after it is winterized. However, it is important to note that some RVs are better suited for colder temperatures than others.
While the antifreeze liquid will protect the plumbing from freezing and expanding, it isn’t a given that your RV is sufficiently insulated and adapted to survive the coldest temperatures.
How Hard Is It to Winterize an RV?
Winterizing your RV varies in difficulty depending on your winterizing experience and RV model. However, you can easily do it by following the preceding steps.
Do You Put RV Antifreeze in the Freshwater Tank?
While it’s technically safe to introduce antifreeze into the freshwater tank, it’s advisable to refrain from doing so. It’s best practice to solely direct the antifreeze into the valves and appropriate areas for optimal results.
How Do You Winterize a Camper for Beginners?
Beginners RV owners can winterize their camper by gathering supplies like RV antifreeze and drain tanks. After collecting supplies, drain all forms of liquids from the RV and add antifreeze into the plumbing system by using a hand pump or converter kit, ensuring all faucets and toilets are covered.
What Should I Add to My Shopping List When Winterizing an RV?
You need to make a checklist of these items before completing the steps to winterize your RV:
- RV antifreeze
- Water heater bypass kit (if your RV doesn’t have one)
- A water pump converter kit or hand pump
- Basic tools (screwdriver, pliers, and wrench)
- Sealant (for any gaps or openings in the RV’s exterior)
- Battery charger or maintainer (to keep batteries charged during storage)
Disclaimer: The information provided in this article is intended for general guidance and informational purposes only. Safety practices and regulations may vary based on your location, the type of recreational vehicle, and local laws. Always prioritize your safety and the safety of those around you when handling chemicals and operating a recreational vehicle. This article does not replace professional training, consultation with RV winterization experts, or adherence to local and national safety regulations. The author and the website are not liable for any actions taken or consequences resulting from the use of the information presented in this article. Your safety is your responsibility, and we encourage you to take it seriously.


