
As unused and uninhabitable spaces, attics can be costly to homeowners. In fact, as much as 25% of a home’s heat could escape from the attic if it’s poorly insulated.
On top of that, 90% of U.S. homes are found to be under-insulated, according to a study by the Boston University School of Public Health (BUSPH). This can lead to ice dams, which may cause leaks and dangerous structural damages that are expensive to repair.
Besides preventing damage, insulating your attic is a great way to keep your home cool. Once insulated, the space could be used as a climate-controlled storage space or serve as an extra room, depending on its size.
Sound intimidating? It shouldn’t be. Here’s everything you need to know about insulating your attic.
Worried about how heat/humidity will affect your belongings? Explore our Covered Storage vs. Uncovered Storage Guide and our Climate-Controlled vs. Non-Climate-Controlled Storage Guide.
The Safety Precautions to Take
Every home renovation comes with its safety considerations, but attic projects can be especially dangerous because these areas aren’t always designed to hold a person’s weight.
Before you start working, test the floor’s stability by applying gentle pressure with your foot. Keep your weight on the rafters, and if any spot feels unstable or sags, avoid the area or consider seeking help from a professional.
Attics are also typically cramped and poorly lit. Be mindful of potential tripping hazards, such as loose debris or clutter, exposed nails, or loose electrical wiring. Bring a headlamp or flashlight to help you illuminate the space.
When working with power tools, always wear the proper protective equipment, such as gloves, goggles, and a mask. Avoid tools that create excessive dust.
Different Approaches for Finished vs. Unfinished Attics
If you plan on creating a finished attic, you’ll need to approach your home improvement project differently. In an unfinished attic, you want to prevent heat from escaping your home through the attic. However, if you plan on living in your attic, you’ll need to allow heat to enter this space to make it livable.
Converting your attic into a habitable room is a much bigger project, but we’ll provide some helpful tips on executing it at the bottom of this guide.
Supplies Needed for the Project
The tools and materials you need for this project will depend on the type of insulation you choose and the structure of your attic. Here’s a breakdown of some of the supplies you might need.
Tools and Materials
Here are some common tools used in attic insulation projects:
- Measuring Tape: To measure the dimensions of the attic space and insulation materials.
- Utility Knife or Insulation Cutter: for cutting insulation materials to fit around obstacles and into tight spaces.
- Staple Gun or Insulation Supports: These are used to secure insulation batts between joists or rafters.
- Safety Gear: This should include a flashlight, gloves, goggles, and a dust mask to protect against irritation from insulation fibers and airborne particles.
- Insulation Supports or Wire Mesh: this holds loose-fill insulation in place and prevents it from settling over time.
- Extension Cord: If using powered equipment, such as an insulation blowing machine or spray foam gun, ensure you have a suitable extension cord to reach the attic space.
The Insulation Process
Types of Insulation
Here are some of the most common types of attic insulation:
- Batt and Blanket Insulation: This is the most common type of insulation. It typically consists of fine glass fibers, mineral wool, or natural fibers. It’s inexpensive, easy to install, and offers good thermal performance.
- Loose-fill Insulation: This type of insulation is usually made of fiberglass or cellulose, but it’s blown in with a machine, which makes it great for insulating irregularly shaped or hard-to-reach areas.
- Spray Foam Polyurethane: As the name suggests, this type of insulation is sprayed onto surfaces and then thickens into a durable foam.
How Much Insulation Do I Need to Insulate My Attic?
Not sure how much insulation you need? It’s time to become acquainted with the “R-value.” The R-value measures thermal resistance and tells you how well a material insulates against heat. Materials with a higher R-value, like R-49 to R-60, provide better insulation than materials with a low R-value, like R-30 to R-49.
To determine the appropriate R-value for your home, you’ll need to determine what climate zone you live in (which you can check here). Next, explore this chart published by the U.S. Department of Energy to determine the right R-value based on the zone you live in.
Keep this number in mind when shopping for insulation. Fiberglass insulation and cellulose insulation tend to have lower R-values, while spray foam insulation has a higher R-value.
How to Insulate an Attic: Getting Started
To properly insulate your attic, it’s important to prepare the space the right way. Take these steps to get the most out of your attic insulation.
- Repair any roof leaks before getting started.
- Keep your insulation away from any electrical fixture, as this can be a fire hazard.
- If your home vents exhaust into the attic space, take the time to direct those vapors outdoors.
- Remove any boxes or items on the floor.
- Fill gaps and drafty spaces with caulk or foam sealant. Common gaps include the areas around attic windows, pipes, wires, exhaust fans, and ducts.
- Use planks or plyboards to form a safe walking space.
Steps to Insulating an Unfinished Attic
Insulate your unfinished attic with these five simple steps. Most attics already have some insulation, so you’ll likely just have to add to the existing insulation.
Step #1: Provide a moisture barrier.
Skip this step if you’re adding to existing insulation.
If your attic doesn’t have insulation (or you removed all of the existing insulation), you will need to create a moisture barrier between the warm air circulating in your house and the cooler air circulating in the attic. Polyethylene sheeting works great for this.
The polyethylene should cover the entire attic floor with some overlap around the edges. If you’re using multiple sheets of polyethylene, overlap the seams and seal them with a compatible adhesive or tape designed for polyethylene sheeting. Use tape or staples to secure the polyethylene sheeting to the floor.
Step #2: Insulate the Hatch Door
Don’t forget about your hatch door, as this can let more cool air into your home. Staple some insulating materials to the door and add weather stripping for a tight seal.
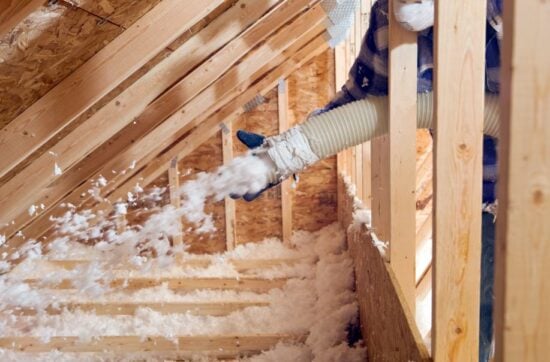
Step #3: Set up the Blower (For Loose-Fill Insulation Only)
If you’re using loose-fill insulation, you’ll need another person to help you use the machine. Start by positioning the blower machine outside of your attic and snake the hose into the space you plan to fill.
Your partner will crumble the loose insulation into the hopper while you control the hose inside the attic. These machines are loud, so you may not be able to communicate with your partner while it’s on.
Step #4: Add Insulation Between Joists
When using blanket or batt insulation, measure and cut pieces, then layer them between the joists. If using multiple pieces of insulation, overlap the seams by at least a few inches. Keep going until you’ve layered the insulation deep enough to cover the tops of the joists.
Cut openings in the insulation to accommodate for any obstacles such as pipes, vents, or access points, and use foam sealant or insulation tape to seal around these openings.
If you’re using loose-fill insulation, position yourself inside the attic while your partner operates the machine. No matter what type of insulation you use, start with the wall furthest from the attic opening so you don’t trap yourself inside.
Step #5: Inspect and Adjust
Continue applying insulation until you reach the target R-value. Once all insulation is installed, inspect the attic for any missed spots or uneven coverage.
Considerations for Making Your Attic a Liveable Space
Take your home improvement project to the next level by converting your attic into a liveable space. This project, albeit a bit more extensive, will maximize your living space while promising a better-insulated attic.
Here are some details you’ll need to consider before turning your attic into a liveable space:
- Zoning and Land Use Regulations: Check local zoning and land use regulations to ensure that your attic conversion project complies with any zoning requirements.
- Assess Structural Integrity: Before beginning any renovations, ensure that your attic’s structure can support the additional weight of people, furniture, and fixtures. We recommend consulting with a structural engineer.
- Install Flooring and/or Subflooring: Assuming your attic joists are designed to support flooring, select and install appropriate flooring materials. Ensure that the subfloor is stable and level before laying the flooring material.
- Plan for Natural Light: Consider adding skylights or windows to bring in natural light and provide views of the outdoors.
- Upgrade Electrical and Plumbing: If you plan to add electrical outlets, lighting fixtures, or plumbing fixtures to your attic space, consult with a licensed electrician or plumber.
- Consider Heating and Cooling: Determine how you will heat and cool your attic space. Options include extending your existing HVAC system or installing a mini-split heating and cooling system.
- Relocating Belongings: If you’re currently using your attic as a storage space, you’ll need a place to relocate the items that are currently stored there. Consider moving belongings into a self-storage unit or private garage. Explore peer-to-peer storage marketplaces, like Neighbor, for month-to-month storage options.
And, of course, complete your project by adding furniture, decorations, and a rug to make the space comfortable and to add personality.
In Summary
Remember that optimizing energy efficiency shouldn’t stop at the attic. If your home has older windows, it might be time to replace them with double or triple-pane windows or invest in thermal curtains. You may also consider adding weatherstripping around your door frame or installing a door sweep.


